
Guide · · AF-Automotive
ABC suspension calibration: the angle step explained
Active Body Control is one of the cleverest suspensions Mercedes ever built, and one of the fussiest to set up. If you have just replaced a strut, a level sensor or a valve block, the car will not sit right until the ride height is taught again. This guide walks through the angle step of that calibration: what it is, why it matters, and how to get it right the first time.
What ABC is, in one minute
ABC (Active Body Control) is a hydraulic suspension. A high pressure pump feeds a plunger cylinder on top of each spring strut, and the control unit adjusts each corner many times per second to keep the body flat in corners and under braking. You will find it on cars such as the CL and S-Class (W215, W220, W221) and the SL (R230, R231).
Because the system controls each corner on its own, the control unit has to know exactly where "level" is. That is what the ride height calibration does.
When you need to calibrate
- After replacing a level sensor or its linkage
- After replacing a strut, plunger cylinder or valve block
- After replacing the ABC control unit
- When the car sits visibly lower on one corner or leans to one side
- When level or ride height faults stay after the repair
Where the angle step comes in
On many ABC cars the diagnostic routine asks you to measure each corner and type in a value. Depending on the model and the software, that value is either a height measured from the wheel centre to the wheel arch, or the angle of a suspension arm measured with an inclinometer. The control unit uses the four values to work out the true position of each level sensor.
If one of those numbers is off by a fraction of a degree, the car will be calibrated to that error. That is why the measuring step deserves as much care as the repair itself.
Before you start
- Fluid: check the ABC fluid level and look for leaks. Calibration cannot fix a corner that is losing pressure.
- Surface: use a level lift or a flat floor. A lift that is a few millimetres out on one side will show up in the angles.
- Battery: connect a battery charger. The routine can take a while with the ignition on.
- Tyres: set all four tyres to the pressure on the door pillar label.
- Load: empty the boot and cabin, and set fuel level and engine state as the routine asks.
Step by step
- Connect your diagnostic tool and open the ride height or level calibration routine for the ABC system.
- Follow the prompts until it asks for the measured values for each corner.
- Let the car settle. Roll it back and forth a short distance or bounce each corner gently, then wait a minute for the system to stop correcting.
- Clean the measuring point on the suspension arm or half shaft so the tool sits on bare metal, not dirt.
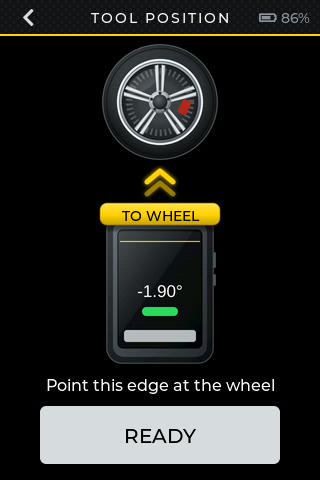
- Hold the angle tool against the measuring point shown in the routine and read the value for front left. With ASAT pro, hold it under the arm with the base pressed up against it and the screen facing down toward you.
- Repeat for front right, rear left and rear right, always with the tool facing the same way.
- Type each value into the scanner, taking care with the sign (plus or minus) and with left and right.
- Finish the routine as the scanner describes, so the control unit stores the new values.
- Check the result: drive a short distance, park on the level surface and measure again.
Tips that save a second attempt
- Don't lean on the car. Every person standing on a sill or leaning on a wing moves the reading.
- Same direction every time. If the tool has a marked end, point it the same way at every corner. ASAT pro shows a TO WHEEL arrow for this.
- Read twice. Take the reading, lift the tool off, place it again. The two values should agree.
- Watch the temperature. A cold car straight from outside and a warm car after a test drive can sit differently. Measure under the same conditions you check the result in.
Frequently asked questions
Can I use a phone app as an inclinometer? You can try, but most phones are accurate to a few tenths of a degree at best, and the phone's shape rarely sits flat on a round arm. For a calibration the car will keep for years, a dedicated instrument is worth it.
How accurate does the measurement need to be? Mercedes does not publish a single figure for every model, but small angle errors become millimetres of ride height at the wheel. The dealer Romess gauge and the Haweka inclinometer both state ±0.1°. ASAT pro is made for ±0.1° or better.
The car is still uneven after calibration. Now what? See the seven common causes of an uneven car after level calibration. The most frequent are a wrong sign, swapped corners, or a mechanical fault that calibration cannot fix.
About ASAT pro
ASAT pro for Mercedes is a standalone measuring instrument made for ride height calibration. Hold it under the arm or shaft with its 4-point base pressed up against it and the screen facing down toward you, read the angle (±0.1° or better) and type it into whatever diagnostic tool you use. Guided mode walks you through all four corners in a fixed order, locks each value when the reading is steady, and shows all four on one summary screen. A built-in flashlight lights the measuring point, and the touch screen works with gloves.
ASAT pro for Mercedes is $1,099. ASAT pro Alu for Mercedes, with a CNC aluminum base, is $1,299. Designed and built by AF-Automotive. Professional measurement made simple.
More articles
- How to measure the angle for Mercedes AIRMATIC calibration
- How to choose an angle tool for Mercedes ride height calibration
- Replacing a Mercedes air strut: the complete checklist
- Car sits uneven after level calibration: 7 common causes
Mercedes-Benz, AIRMATIC, ABC, Active Body Control and E-ACTIVE BODY CONTROL are trademarks of Mercedes-Benz Group AG. Romess, Haweka and Autel are trademarks of their owners. AF-Automotive is an independent company and is not affiliated with any of them. Prices are approximate as of October 2026 and may change. Always follow the manufacturer's repair information for your vehicle.