
Guide · · AF-Automotive
Car sits uneven after level calibration: 7 common causes
You ran the calibration, the scanner said "completed", and the car still leans. It happens in good workshops every week. In most cases the cause is one of a short list, and you can find it in a few minutes with a methodical check. Here are the seven we see most often, starting with the quickest to rule out.
1. A plus became a minus
Angle values can be positive or negative, and many tools show the sign in small print. Type +1.25° as -1.25° and the control unit will happily calibrate one corner the wrong way.
How to check: compare the values you entered with the values on the scanner's actual value screen. A corner sitting high or low by roughly twice the expected amount is a typical sign error.
2. Left and right swapped
Standing at the rear of the car, "left" is easy to confuse, especially when you measure from underneath. Swapped values make the car lean to one side.
How to check: look at the order you measured in and the order the scanner asks for. Agree on one rule in the workshop: left and right are always as seen from the driver's seat.
3. The wrong measuring point
Each model has a specific place to measure: a flat on the lower arm, the half shaft, or another point given in the repair information. A few centimetres to one side can change the angle, especially on curved or cast arms.
How to check: confirm the point in the repair information, clean it to bare metal, and measure again.
4. The car or the lift is not level
A lift that sits a few millimetres lower on one side adds that error to every reading on that side. The same goes for a sloping workshop floor.
How to check: measure the lift runways or the floor with the same tool before you start. If they are not level, correct them before you measure.
5. A dirty contact point or a tool that needs checking
A bit of road dirt or underbody coating between the tool's feet and the arm can be worth several tenths of a degree. A tool that has been dropped may also read slightly off.
How to check: clean the point, take the reading twice, and turn the tool end for end on a flat surface. A good instrument reads the same value with the opposite sign. If it does not, have it checked.
6. Tyres, load and fuel
The calibration assumes a car in a defined condition: correct tyre pressures, empty boot, and often a given fuel level. A heavy toolbox in the boot or one soft tyre will be calibrated in.
How to check: set tyre pressures to the label, empty the car, and recalibrate under the conditions the routine asks for.
7. A fault calibration cannot fix
If a strut is leaking, a valve block is sticking, or a level sensor linkage is bent or loose, the car will drift away from the calibrated height again. Calibration teaches the control unit where level is; it cannot hold up a corner that is losing air or fluid.
How to check: leave the car parked overnight and measure again in the morning. A corner that has dropped points to a leak. Check the level sensor linkage by hand for play, and read the fault memory for pressure or valve faults.
How to confirm the result
- After the routine, switch off, wait, and start the car again.
- Drive a short distance so the suspension settles.
- Park on the same level surface and measure all four corners again.
- Compare with the target values in the repair information.
When to redo the calibration
Redo it only after you have found the cause. Repeating the routine with the same error just stores the same error again. Causes 1 to 3 are the quickest to rule out, so start there.
About ASAT pro
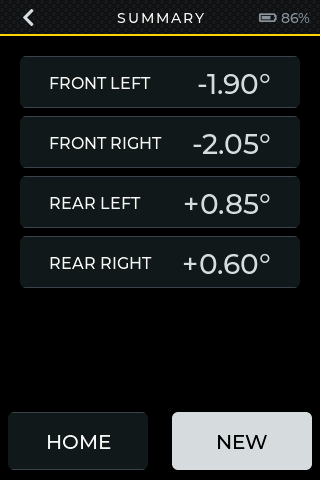
ASAT pro for Mercedes is a standalone measuring instrument made for ride height calibration. Hold it under the arm or shaft with its 4-point base pressed up against it and the screen facing down toward you, read the angle (±0.1° or better) and type it into whatever diagnostic tool you use. Guided mode walks you through all four corners in a fixed order, locks each value when the reading is steady, and shows all four on one summary screen. A built-in flashlight lights the measuring point, and the touch screen works with gloves.
ASAT pro for Mercedes is $1,099. ASAT pro Alu for Mercedes, with a CNC aluminum base, is $1,299. Designed and built by AF-Automotive. Professional measurement made simple.
More articles
- How to measure the angle for Mercedes AIRMATIC calibration
- ABC suspension calibration: the angle step explained
- How to choose an angle tool for Mercedes ride height calibration
- Replacing a Mercedes air strut: the complete checklist
Mercedes-Benz, AIRMATIC, ABC, Active Body Control and E-ACTIVE BODY CONTROL are trademarks of Mercedes-Benz Group AG. Romess, Haweka and Autel are trademarks of their owners. AF-Automotive is an independent company and is not affiliated with any of them. Prices are approximate as of October 2026 and may change. Always follow the manufacturer's repair information for your vehicle.